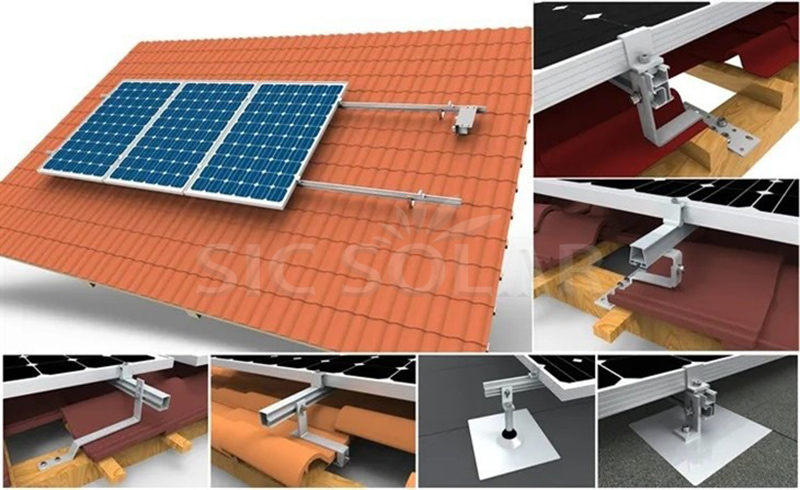
Installing solar panels on tiled roofs requires careful planning and precision to ensure the system is securely attached without damaging the tiles or compromising the roof integrity.
The Challenges of Installing on Tiled Roofs
- Fragility of Tiles
Tiles, especially clay and ceramic tiles, are prone to cracking or cracking during installation. - Roof Waterproofing
Drilling or installation misalignment can create gaps, which can lead to potential leakage. - Variety of Tile Designs
Tiles come in a variety of shapes (flat, curved, or interlocking), so it is crucial to choose an adaptable mounting system. - Aesthetic Concerns
Visible and misaligned systems can damage the appearance of the roof.
Methods for Fixing Solar Panels to Tiles
- Tile Replacement Brackets
- How It Works: Replace some roof tiles with metal brackets that mimic the original tile shape.
- Advantages: Maintain the water resistance of the roof without drilling holes in the tiles.
- Application: Commonly used in clay, concrete and ceramic tiles.
- Hook-Based Mounting Systems
- How It Works: Stainless steel hooks slide under existing bricks and attach to the roof structure.
- Advantages: Prevents direct contact or drilling into the tiles.
- Compatibility: Suitable for curved or interlocking tiles.
- Example: SIC Solar tile hooks are designed for easy installation and long-lasting durability.
- Adhesive and Rail-Free Systems
- How It Works: Adhesive-mounted bases are used, eliminating the need for traditional rails.
- Advantages: Lightweight and ideal for preserving roof integrity.
- Considerations: Requires thorough cleaning of the tile surface for proper adhesion.
- Drill and Seal Technique
- How It Works: Drilling into the tile and roof structure with proper sealing to prevent leaks.
- Advantages: Provides a strong and permanent installation.
- Caution: Precision is essential to avoid cracking tiles or creating weak points.

Key Steps for Installing Solar Panels on Tiles
- Assess the Roof Type
Understand the tile material (e.g., clay, slate, or concrete) and design to select the most suitable mounting system. - Prepare the Area
- Remove debris and inspect tiles for cracks or damages.
- Replace damaged tiles to ensure a stable foundation.
- Select the Right Mounting System
- For curved tiles, consider hook-based systems.
- For flat tiles, replacement brackets or adhesive systems may be ideal.
- Install the Mounting Brackets
- Attach the brackets or hooks to the roof structure (rafters or beams) for stability.
- Ensure proper alignment and spacing based on panel dimensions.
- Place the Rails and Panels
- Attach rails to the brackets for a secure base.
- Mount the solar panels onto the rails, ensuring even distribution of weight.
- Seal and Inspect
- Apply waterproof sealant to any drilled areas.
- Conduct a final inspection to check for gaps, loose components, or tile damage.
Benefits of Tile Roof Solar Panel Systems
- Durable Installation: Properly mounted systems last decades without compromising roof integrity.
- Energy Efficiency: Tile roofs, known for their insulation properties, complement solar panels in optimizing energy performance.
- Aesthetic Appeal: Professional mounting systems, such as those offered by SIC Solar, provide a clean and streamlined appearance.
Why Choose SIC Solar for Tiled Roof Mounting Systems?
SIC Solar offers a range of high-quality photovoltaic mounting solutions tailored to various roof types, including tiled roofs. Their innovative designs, such as tile hooks and replacement brackets, prioritize durability, ease of installation, and waterproofing. SIC Solar’s commitment to quality ensures that solar panel installations remain secure and efficient throughout their lifespan.
Mounting solar panels on tiled roofs can be a seamless process when using the right tools and methods. By choosing specialized components like those provided by SIC Solar and following best practices, homeowners can enjoy a long-lasting and visually appealing solar energy system.